
How to Upscale Image to 4K Without Losing Quality (2026)
2026-04-28 · 17 min read · Enhancer Team
Upscaling an image to 4K sounds simple, but most tools just stretch the pixels. The result is a blurry, soft mess that looks worse than the original. I have tested over a dozen tools to find what actually works.
The good news is that AI image upscalers can now add real detail, not just size. They use smart technology to fill in missing pixels with natural-looking sharpness. Some are free, some are paid, and a few give shockingly good results.
Below, you will find the best free and paid tools, my real test results, and step-by-step instructions. You will also learn the common mistakes that ruin up-scaled images. By the end, you will know exactly which tool fits your needs, including a free option like Photo Quality Enhancer that handles 4K upscaling in seconds.
What Does Upscaling an Image to 4K Actually Mean?
Upscaling means making a smaller image larger without making it blurry. 4K means the image has 3840 x 2160 pixels. That's about 8.3 million pixels packed into one image.
When you upscale a photo, the software adds new pixels to fill the bigger size. Old methods just stretched and blurred the image. New AI tools predict what those missing pixels should look like.
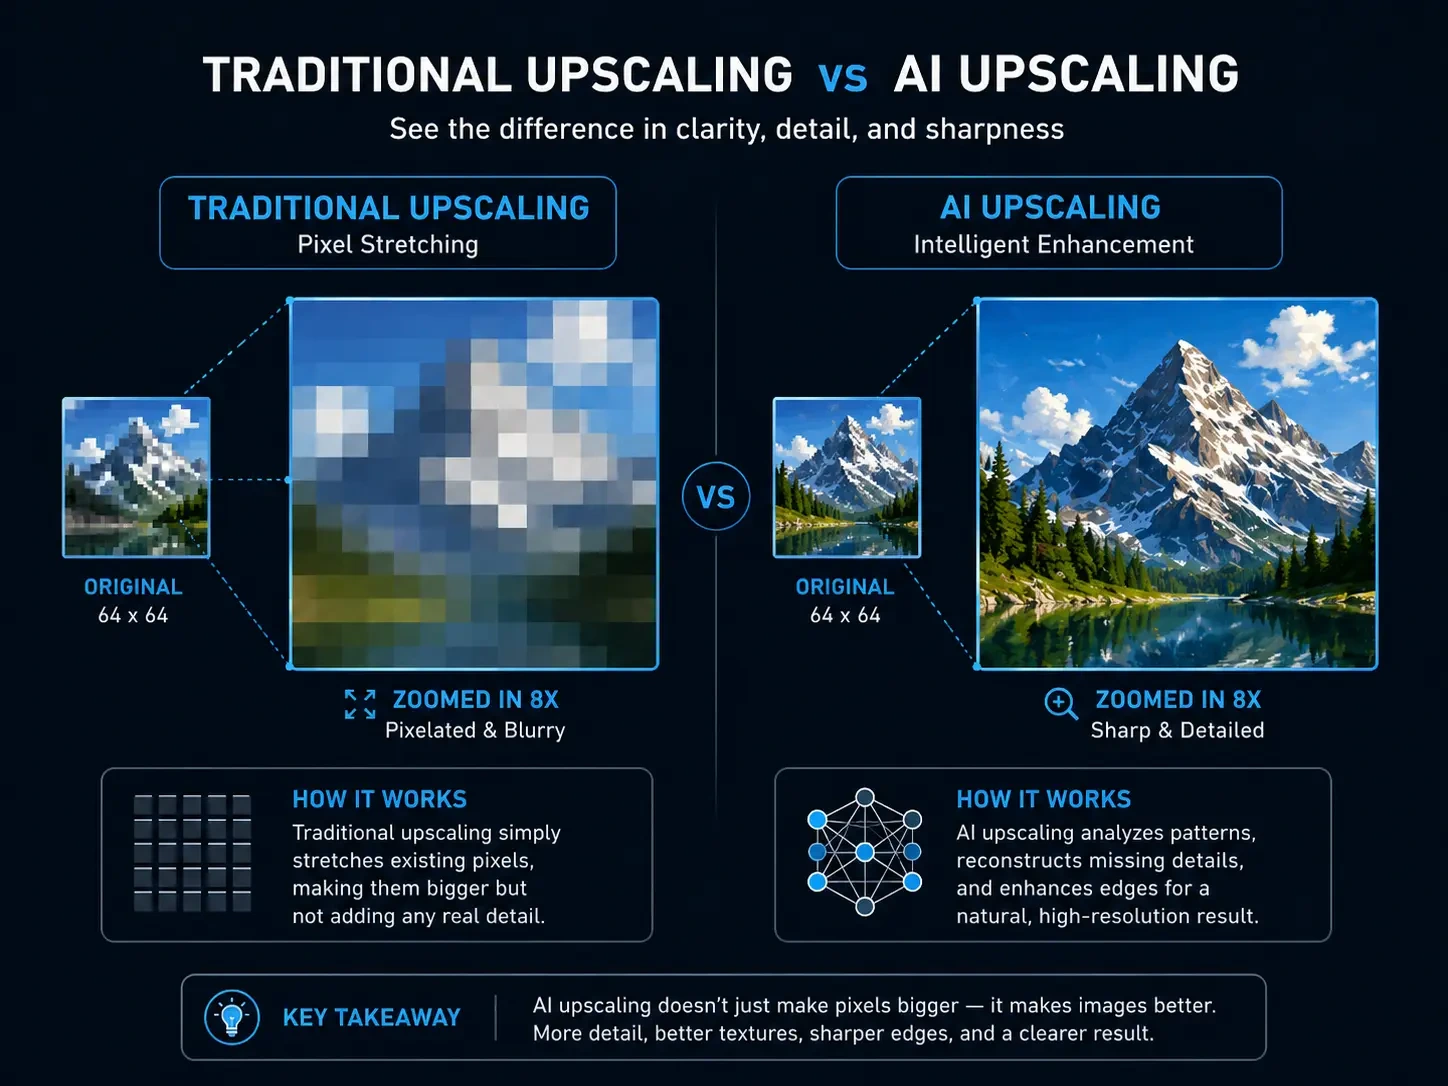
The Old Way vs The AI Way
Traditional upscaling tools like basic Photoshop resizing used simple math. They took two pixels and guessed the color in between. The result was always softer than the original.
AI upscalers work differently. They use deep learning models (computer programs trained on millions of images). These models recognize edges, textures, and patterns, then rebuild the image at a higher resolution.
Why 4K Matters in 2026
4K is now the standard for most modern screens, TVs, and online platforms. Low-resolution images look pixelated on big displays and high-DPI phone screens. A sharp 4K image keeps your content looking professional everywhere.
Here's where 4K images make the biggest difference:
• Product listings: Sharper photos build buyer trust
• Social media: Instagram and Pinterest reward high-quality images
• YouTube thumbnails: 4K previews look crisp at any size
• Print materials: Posters and brochures need at least 300 DPI
• Web design: Retina displays expose every blurry pixel
What "Without Losing Quality" Really Means
No tool can magically create perfect detail from nothing. The phrase "without losing quality" means the upscaled image should look as sharp or sharper than the original. It should not look blurry, stretched, or fake.
A good AI upscaler keeps natural details, edges, and colors intact. A bad one creates plastic-looking faces, distorted text, or weird patterns. Tools like Photo Quality Enhancer are designed to keep results natural while pushing resolution up to 4K or even 8K.
Best AI Tools to Upscale Images to 4K Without Losing Quality
Table of contents⌄
- What Does Upscaling an Image to 4K Actually Mean?
- The Old Way vs The AI Way
- Why 4K Matters in 2026
- What "Without Losing Quality" Really Means
- Best AI Tools to Upscale Images to 4K Without Losing Quality
- 1. Photo Quality Enhancer (Best Free Online Tool)
- 2. Topaz Photo AI (Best Overall, Paid)
- 3. Upscayl (Best Free Desktop Option)
- 4. Let's Enhance (Best for Large File Uploads)
- 5. VanceAI (Best for Bulk Processing)
- 6. Gigapixel AI by Topaz (Best for Extreme Upscaling)
- Free vs Paid: Which Should You Choose?
- How to Upscale an Image to 4K Step by Step
- Step 1: Choose the Right Source Image
- Step 2: Pick the Right AI Model or Category
- Step 3: Set the Upscale Factor
- Step 4: Choose the Output Format
- Step 5: Process the Image
- Step 6: Compare Before and After
- Step 7: Save and Optimize
- Quick Recap of the Workflow
- Common Mistakes to Avoid When Upscaling Images to 4K
- Mistake 1: Starting With a Tiny or Damaged Image
- Mistake 2: Using the Wrong AI Model
- Mistake 3: Upscaling Too Aggressively
- Mistake 4: Ignoring File Format
- Mistake 5: Not Compressing the Final Image
- Mistake 6: Trusting the Output Without Checking
- Mistake 7: Over-Sharpening After Upscaling
- Mistake 8: Forgetting to Test Multiple Tools
- Mistake 9: Using Free Tools With Watermarks
- Mistake 10: Ignoring the End Use
- In Conclusion
- Frequently Asked Questions
- 1. What is the best free AI tool to upscale images to 4K?
- 2. Can AI really upscale an image to 4K without losing quality?
- 3. How do I upscale an image to 4K online for free?
- 4. What is the difference between AI upscaling and Photoshop resizing?
- 5. Does upscaling an image to 4K make the file size much bigger?
- 6. Is it legal to upscale and use AI-enhanced images for business?
- 7. What happens if I upscale an already 4K image to a higher resolution?
- 8. Why does my AI-upscaled image look fake or plastic?
- 9. Which AI upscaler is best for product photos on Amazon and Shopify?
- 10. Can AI upscaling fix old or damaged photos?
I tested over a dozen AI upscalers on real photos, blurry product images, and old screenshots. Some gave amazing results. Others made things worse.
Here are the tools that actually work, broken down by use case and budget. Each one has its strengths, so pick based on what you need.
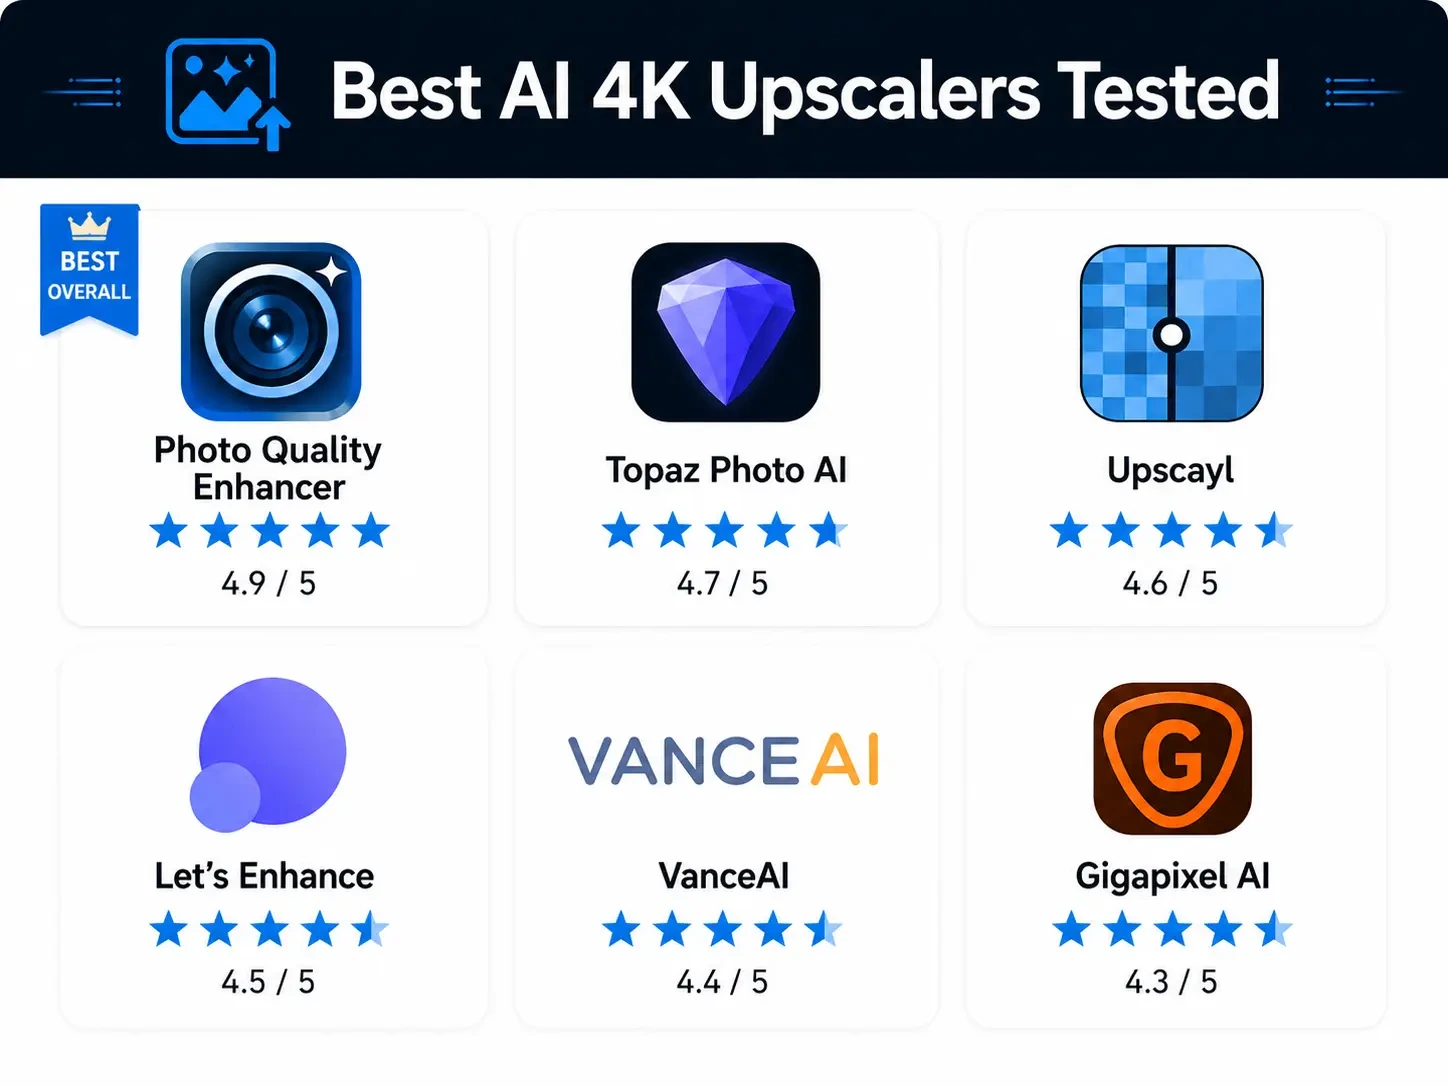
1. Photo Quality Enhancer (Best Free Online Tool)
If you want a fast, free, and watermark-free option, Photo Quality Enhancer is my top recommendation for online use. It runs in your browser, processes images in about 2 seconds, and supports 4K and 8K output.
• Price: Free, with 10 enhancements per day
• Best for: Quick edits, e-commerce sellers, casual users
• Output quality: Sharp, natural, no fake plastic look
• Speed: Around 2 seconds per image
• Downside: Daily free limit, 5MB file size cap
My test result: A blurry product photo became a clean 4K version with sharp edges and accurate colors. No watermark, no signup required.
2. Topaz Photo AI (Best Overall, Paid)
Topaz Photo AI is the gold standard for serious users. It handles photos, faces, and even blurry images with impressive detail. The output looks natural, not over-sharpened.
• Price: $199 one-time payment
• Best for: Photographers, designers, agencies
• Output quality: Excellent, near-professional
• Speed: Fast on modern computers
• Downside: No free version, learning curve for advanced settings
My test result: A 720p portrait scaled to 4K kept skin texture and eye details perfectly. No plastic look.
3. Upscayl (Best Free Desktop Option)
Upscayl is open-source, completely free, and runs on your computer. It uses Real-ESRGAN models, which are the same kind used in expensive tools.
• Price: Free forever
• Best for: Beginners, hobbyists, occasional use
• Output quality: Very good for the price
• Speed: Slower on older laptops
• Downside: No cloud version, needs decent hardware
My test result: A blurry vintage photo became sharp and clean. Some fine text got slightly distorted, but overall, the results were great.
4. Let's Enhance (Best for Large File Uploads)
Let's Enhance runs in your browser. No download needed. Just upload an image and download the 4K version.
• Price: Free trial, then $9/month for 100 images
• Best for: Designers and marketers with large files
• Output quality: Strong for product photos
• Speed: Fast, processes in seconds
• Downside: Limited free credits, paywall after trial
5. VanceAI (Best for Bulk Processing)
VanceAI handles batch uploads better than most tools. You can upscale 50 photos at once without losing quality.
• Price: Free for 5 credits, then $9.99/month
• Best for: Online stores with large catalogs
• Output quality: Reliable, consistent results
• Speed: Quick batch processing
• Downside: Watermark on free version
6. Gigapixel AI by Topaz (Best for Extreme Upscaling)
Gigapixel AI can upscale images up to 600% without losing detail. It's overkill for most users, but unbeatable for extreme cases.
• Price: $99 one-time payment
• Best for: Print designers, large displays, restoration
• Output quality: Industry-leading
• Speed: Slower due to deep processing
• Downside: Expensive, heavy on computer resources
Free vs Paid: Which Should You Choose?
The choice depends on how often you upscale and what quality you need.
• Use Photo Quality Enhancer (free, online) for quick everyday use
• Use Upscayl (free, desktop) if you want offline processing
• Use Let's Enhance or VanceAI for monthly bulk needs
• Invest in Topaz or Gigapixel AI if upscaling is your daily job
Most casual users get great results with Photo Quality Enhancer. You don't need to spend $200 unless you upscale images professionally every day.
How to Upscale an Image to 4K Step by Step
The process is simple once you know the right steps. The same basic flow works for almost every AI upscaler, free or paid. I will walk you through it using Photo Quality Enhancer as the example since it's free and runs entirely in your browser.
You can apply these same steps to any tool. The buttons might look different, but the workflow stays the same.
Step 1: Choose the Right Source Image
Start with the best version of your image you have. The clearer the original, the better the 4K result will be. AI tools can fix small issues, but they cannot save heavily damaged photos.
Avoid images that are:
• Heavily compressed (like screenshots from WhatsApp)
• Already blurry from camera shake
• Cropped too aggressively
• Saved multiple times as low-quality JPEGs
A clean 720p photo will always upscale better than a damaged 1080p one. Quality beats size.
Step 2: Pick the Right AI Model or Category
Most upscalers offer different AI models or categories for different image types. Picking the right one makes a huge difference.
• Product images: Best for e-commerce listings on Amazon and Shopify
• Family photos: Best for personal memories and old albums
• Portraits: Best for profile pictures and faces
• Old photos: Best for restoring damaged or faded images
If you pick the wrong model, the AI may add weird textures or smooth out important details. When in doubt, start with the general or balanced option.
Step 3: Set the Upscale Factor
You will see options like 2x, 3x, or 4x. This number tells the tool how much to enlarge your image.
• 2x: Doubles the image size (1080p becomes close to 4K)
• 4x: Quadruples the size (great for small images going to 4K)
• 6x or more: Only for very small source files
For 4K output, calculate based on your source. A 1920x1080 image needs 2x to reach 4K. A 960x540 image needs 4x.
Step 4: Choose the Output Format
Pick the format that matches your end use. Each format has different strengths.
• PNG: Best for screenshots, logos, and images with transparency
• JPEG: Best for photos, smaller file size
• WebP: Best for websites, balances quality and size
For most product photos and blog images, JPEG works well. For website use, WebP gives the best loading speed.
Step 5: Process the Image
Click the upscale or enhance button and wait. Processing time depends on three things:
• The size of your original image
• The upscale factor you chose
• Your computer or the tool's processing power
A small photo takes 5 to 10 seconds. A large photo at 4x might take 1 to 2 minutes. Cloud tools like Photo Quality Enhancer process most images in just 2 seconds.
Step 6: Compare Before and After
Always compare the original and upscaled versions side by side. Look for:
• Sharpness on edges and text
• Natural skin tones (for portraits)
• Clean lines on logos or graphics
• No weird patterns or artifacts
If something looks off, try a different AI model and process the image again. AI upscaling is part science, part trial and error.
Step 7: Save and Optimize
Save your 4K image, but do not stop there. A 4K image can be 5 to 10 MB in size, which is too heavy for websites.
Use a free tool like TinyPNG or Squoosh to compress the file without losing visible quality. Aim for under 500 KB for web use. Keep the full-size version for printing or social media.
Quick Recap of the Workflow
Here is the full process in one quick checklist:
1. Pick the best source image you have
2. Choose the right AI model for your image type
3. Set the upscale factor (2x or 4x for 4K)
4. Select PNG, JPEG, or WebP format
5. Process the image and wait
6. Compare before and after results
7. Save and compress for your end use
Follow this every time and you will get consistent, sharp 4K images.
Common Mistakes to Avoid When Upscaling Images to 4K
Most bad upscaling results come from a few simple mistakes. I made all of them when I started testing these tools. Avoiding them will save you hours of frustration.
These are the errors that turn a good image into a fake-looking mess. Skip them and your 4K images will look natural and sharp.
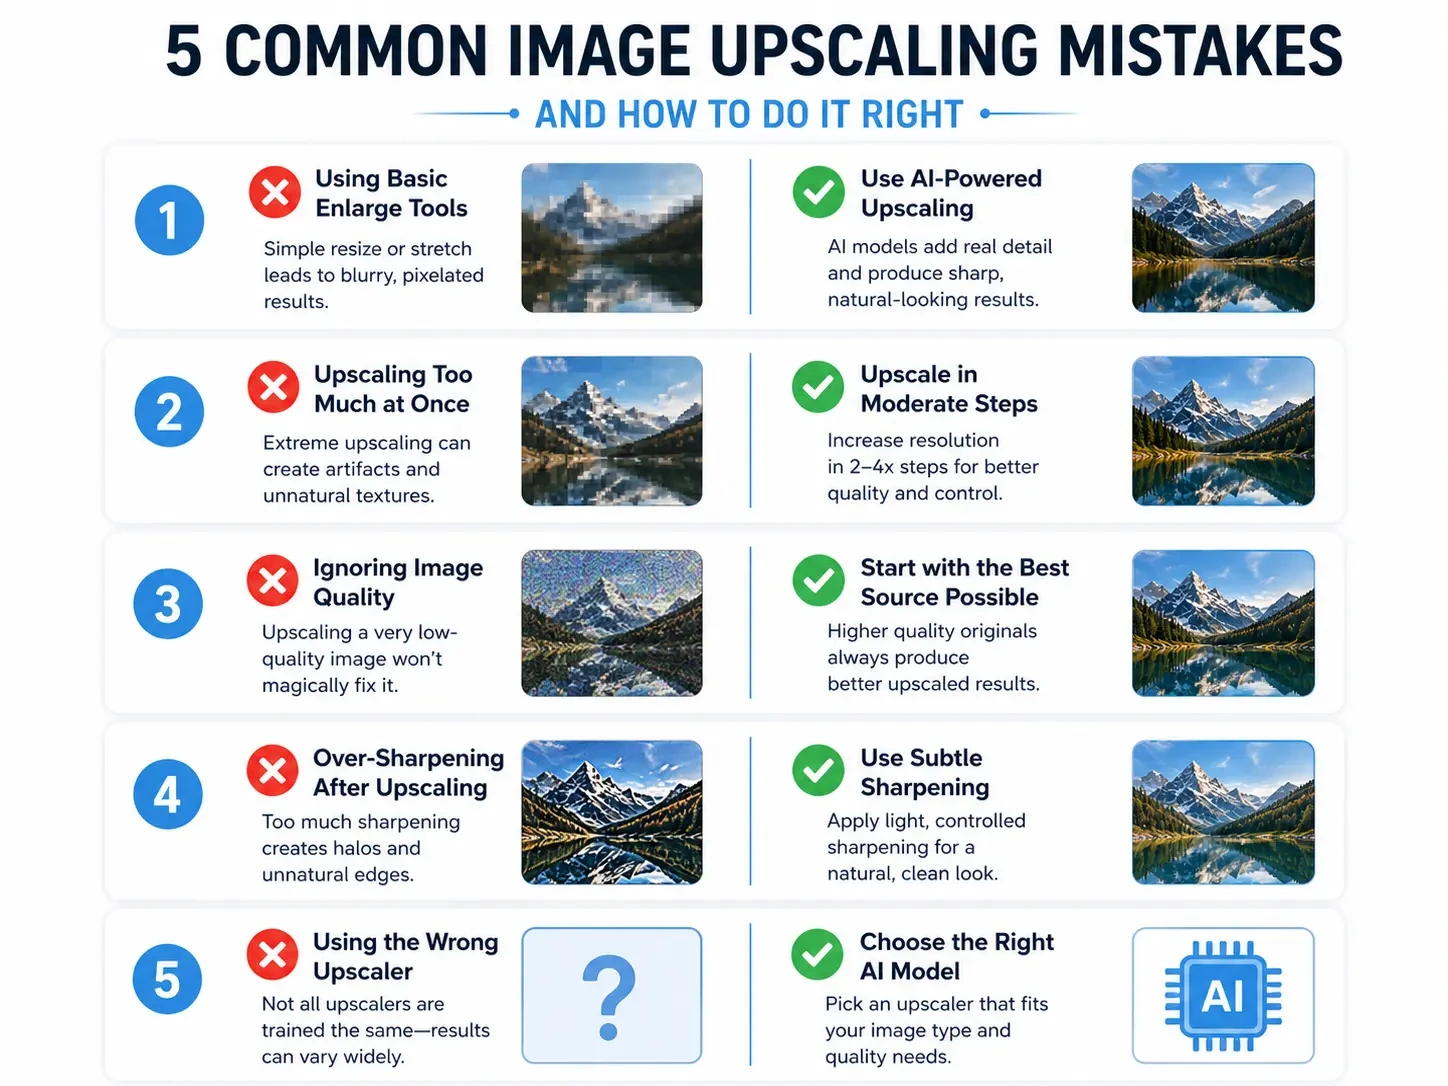
Mistake 1: Starting With a Tiny or Damaged Image
AI upscalers cannot create detail that was never there. A 100x100 thumbnail will never look great at 4K. The bigger and cleaner your source, the better the result.
Always start with the largest version of the image you have. Avoid screenshots from messaging apps, which are heavily compressed.
Mistake 2: Using the Wrong AI Model
Picking the wrong model is the most common mistake. Using an anime model on a real photo gives plastic, unnatural skin. Using a photo model on a logo creates blurry edges.
Always match the model to the image type. Most tools label them clearly: Photo, Anime, Digital Art, or Portrait.
Mistake 3: Upscaling Too Aggressively
Going from 480p straight to 4K with 8x upscaling rarely works well. The AI has too little to work with and starts inventing details.
Stick to 2x or 4x for the best results. If you need a bigger jump, upscale in two passes. First scale to 2x, then run it again at 2x.
Mistake 4: Ignoring File Format
Saving everything as JPEG seems easy, but it can hurt quality. JPEG compression adds artifacts every time you save the file.
Use PNG for graphics, screenshots, and anything with text. Use JPEG for photos. Use WebP for web use where speed matters.
Mistake 5: Not Compressing the Final Image
A 4K image can be 8 to 12 MB in size. That is way too heavy for websites and social media.
Always compress your final image with a tool like TinyPNG, Squoosh, or Compressor.io. You can drop the file size by 70% without visible quality loss.
Mistake 6: Trusting the Output Without Checking
AI tools sometimes mess up faces, text, or fine details. The output may look great at first glance, but fall apart on close inspection.
Always zoom in to 100% and check key areas:
• Faces and eyes (for portraits)
• Text and numbers (for product photos)
• Edges of logos or graphics
• Patterns on clothing or fabric
If something looks weird, switch tools or models. Try Photo Quality Enhancer for a quick second opinion since it processes in seconds and is free.
Mistake 7: Over-Sharpening After Upscaling
Many people add sharpening filters on top of the upscaled image. This usually makes things worse, not better.
Modern AI upscalers already add the right amount of sharpness. Extra filters create harsh edges and a fake look. Trust the AI output and leave it alone.
Mistake 8: Forgetting to Test Multiple Tools
No single tool is best for every image. Topaz might win for portraits, while Upscayl wins for landscapes.
Try the same image in 2 or 3 different tools when quality really matters. Pick the best result for your specific image.
Mistake 9: Using Free Tools With Watermarks
Some free tools add watermarks to the output. Posting a watermarked image on a product page or social media looks unprofessional. Pick a fully free, no-watermark option like Photo Quality Enhancer or use the open-source Upscayl. Never crop a watermark out, it usually leaves traces.
Mistake 10: Ignoring the End Use
A 4K image for printing needs different settings than one for Instagram. Always think about where the image will be used.
• Print: 300 DPI minimum, save as TIFF or high-quality PNG
• Web: 72 DPI is fine, save as compressed WebP or JPEG
• Social media: Match the platform's preferred dimensions
• Marketplace listings: Check Amazon or Shopify size guidelines
Tailoring your output saves storage space and improves performance.
In Conclusion
In conclusion, upscaling an image to 4K without losing quality is now easier than ever thanks to modern AI tools. Old methods just stretched pixels and made images blurry. New AI upscalers add real detail using deep learning models trained on millions of images.
The best tool depends on your needs and budget. For free and fast online upscaling, Photo Quality Enhancer is hard to beat. Upscayl is great for offline desktop work. Topaz Photo AI and Gigapixel AI are worth the investment for professional use.
The process itself is simple. Pick a clean source image, choose the right AI model, set the upscale factor, and process. Always compare before and after, then compress the final file for web use.
Avoid the common mistakes that ruin upscaled images. Skip damaged source files, never use the wrong AI model, and do not over-sharpen the output. Test multiple tools when quality really matters.
A sharp 4K image builds trust on product pages, looks better on social media, and prints beautifully. With the right tool and the right steps, anyone can get professional-quality results in minutes.
Ready to try it yourself? Head over to Photo Quality Enhancer, upload that blurry photo you have been meaning to fix, and run your first 4K upscale today. It takes about 2 seconds and costs nothing.
Frequently Asked Questions
1. What is the best free AI tool to upscale images to 4K?
Photo Quality Enhancer is one of the best free AI tools to upscale images to 4K online. It runs in your browser, gives 10 free enhancements per day, and produces sharp output without watermarks. For desktop use, Upscayl is a strong free open-source option that uses Real-ESRGAN models.
2. Can AI really upscale an image to 4K without losing quality?
Yes, AI can upscale an image to 4K without losing quality if the source image is decent. Modern AI tools use deep learning to add realistic details, sharpen edges, and rebuild missing pixels. The result often looks sharper than the original. Heavily damaged or extremely small images still have limits, even for the best AI.
3. How do I upscale an image to 4K online for free?
You can upscale an image to 4K online for free using Photo Quality Enhancer. Just upload your image, select the category, click enhance, and download the 4K result in about 2 seconds. No signup is required, and there are no watermarks. The tool supports JPG, PNG, WEBP, and JPEG formats up to 5MB.
4. What is the difference between AI upscaling and Photoshop resizing?
AI upscaling adds new details using machine learning, while Photoshop resizing just stretches existing pixels. Photoshop's basic resize creates blurry, soft images at larger sizes. AI tools analyze patterns and rebuild edges naturally. Newer Photoshop versions now include AI features, but standalone AI upscalers usually give better results.
5. Does upscaling an image to 4K make the file size much bigger?
Yes, upscaling an image to 4K significantly increases the file size. A small 500 KB image can become 5 to 10 MB after upscaling. Always compress the final file using TinyPNG, Squoosh, or Compressor.io before using it on websites. Compression can reduce the size by 70% without visible quality loss.
6. Is it legal to upscale and use AI-enhanced images for business?
Yes, it is legal to upscale and use AI-enhanced images for business if you own the original image or have the rights to use it. Most AI upscalers grant full commercial rights to the output. Always check the terms of service for the specific tool you use. Never upscale copyrighted images you do not own.
7. What happens if I upscale an already 4K image to a higher resolution?
Upscaling an already 4K image to 8K rarely improves quality much. The AI has less room to add new detail since the original is already sharp. The file size doubles or triples without a clear visual benefit. Stick to 4K unless you need 8K specifically for large prints or professional displays.
8. Why does my AI-upscaled image look fake or plastic?
AI-upscaled images look fake or plastic when you use the wrong AI model or upscale too aggressively. Anime models on real photos cause this issue most often. Switch to a photo-specific or balanced model and try a lower upscale factor like 2x instead of 4x. Avoid adding extra sharpening filters after upscaling.
9. Which AI upscaler is best for product photos on Amazon and Shopify?
Photo Quality Enhancer, Let's Enhance, and VanceAI are great choices for product photos on Amazon and Shopify. They preserve product colors accurately and meet marketplace size requirements. Photo Quality Enhancer is the fastest free option, while VanceAI is better for processing 50 or more product photos at once.
10. Can AI upscaling fix old or damaged photos?
Yes, AI upscaling can fix many old or damaged photos. Tools like Photo Quality Enhancer, Gigapixel AI, and Topaz Photo AI specialize in restoring vintage images, scanned prints, and faded portraits. They sharpen blurry faces, reduce grain, and recover lost detail. Severely damaged photos with major rips or stains may still need manual editing in Photoshop.